The SOPWITH AVIATION & ENGINEERING CO., LTD., KINGSTON.ON-THAMES, sold kick-starters for their 398cc and provided instructions for fitting them to A.B.C. Motor Cycles.
Richard Johnson was lucky enough to recover an original copy of the leaflet and kindly shared it with the Association of ABC enthusiasts for the benefit of every A.B.C. owner who attempts to make a kick-starter work.
The Kick-starter details will be sent as illustrated in Figure 1.
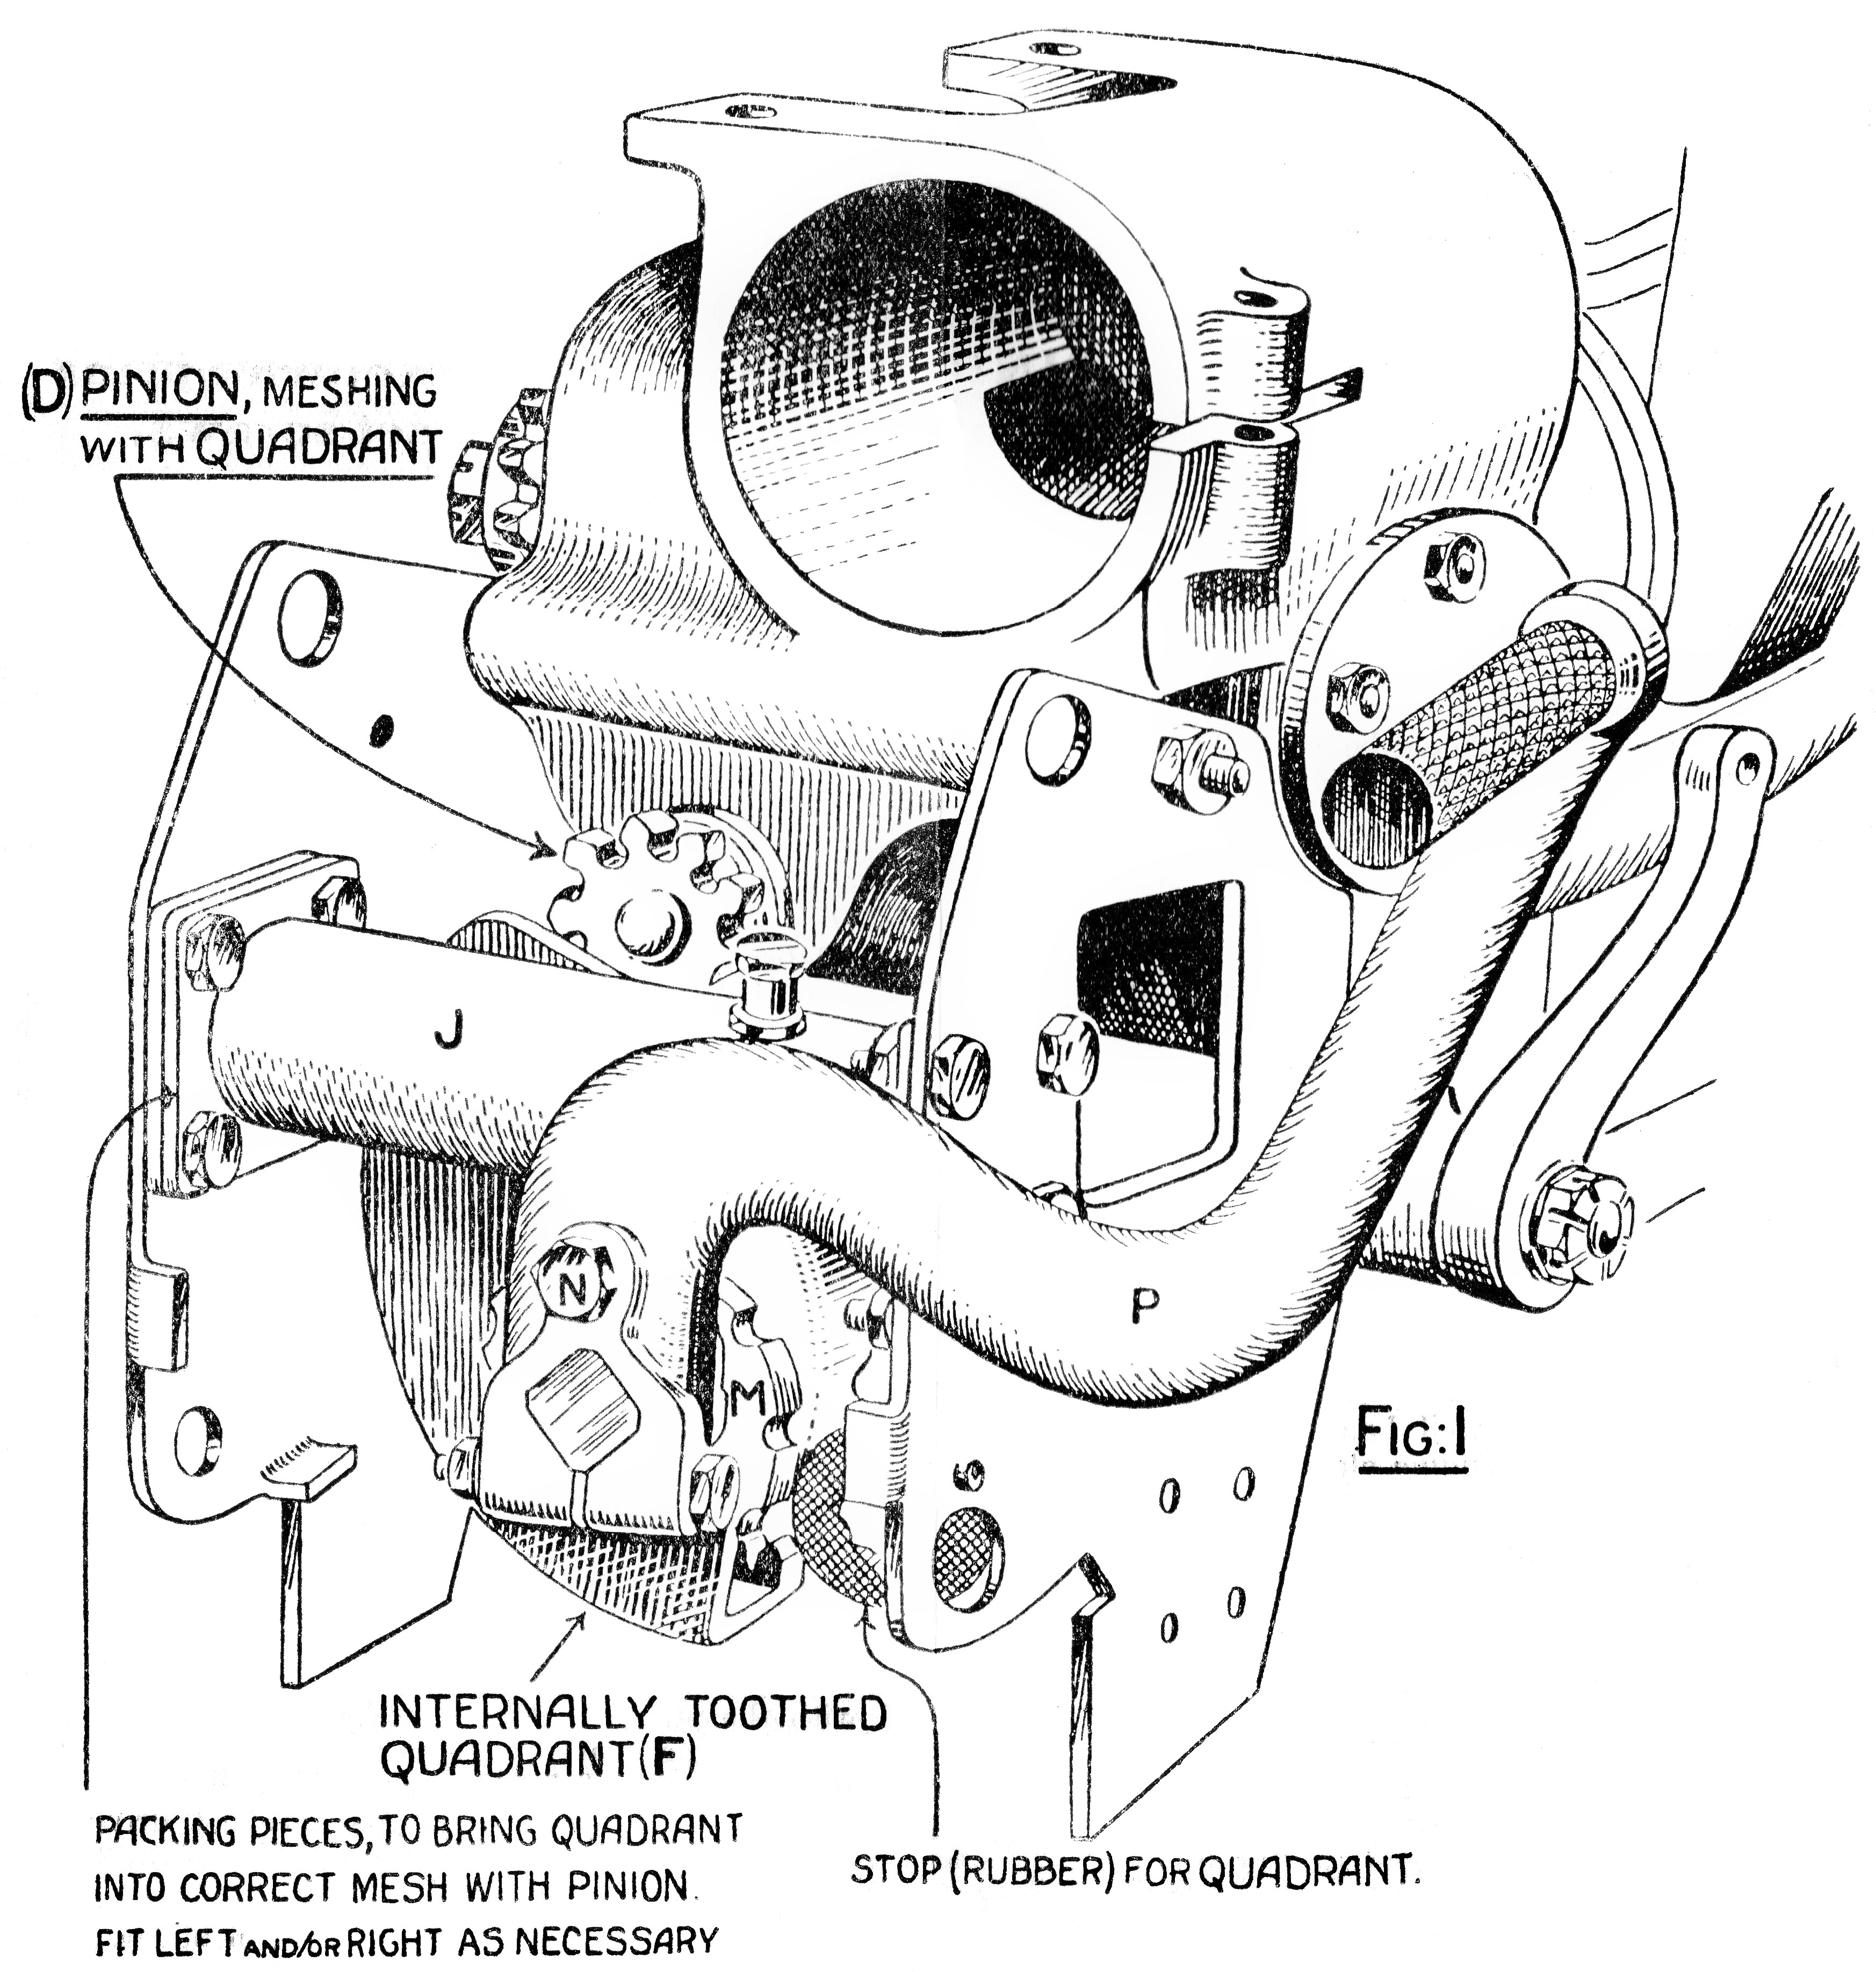
Fig. 1 Shows the Kick-starter details looked at from the back end
In addition to the above, the following parts will be supplied.
- RATCHET NUT (A) (Fig. 3)
- RATCHET SHAFT (B)
- BUSH FOR KICK STARTER (C)
- BRONZE WASHER (E) for Ratchet Shaft
- PINION (D) complete with Return Spring SHIELDING to exclude mud (not shown in illustrations) and 4 set screws
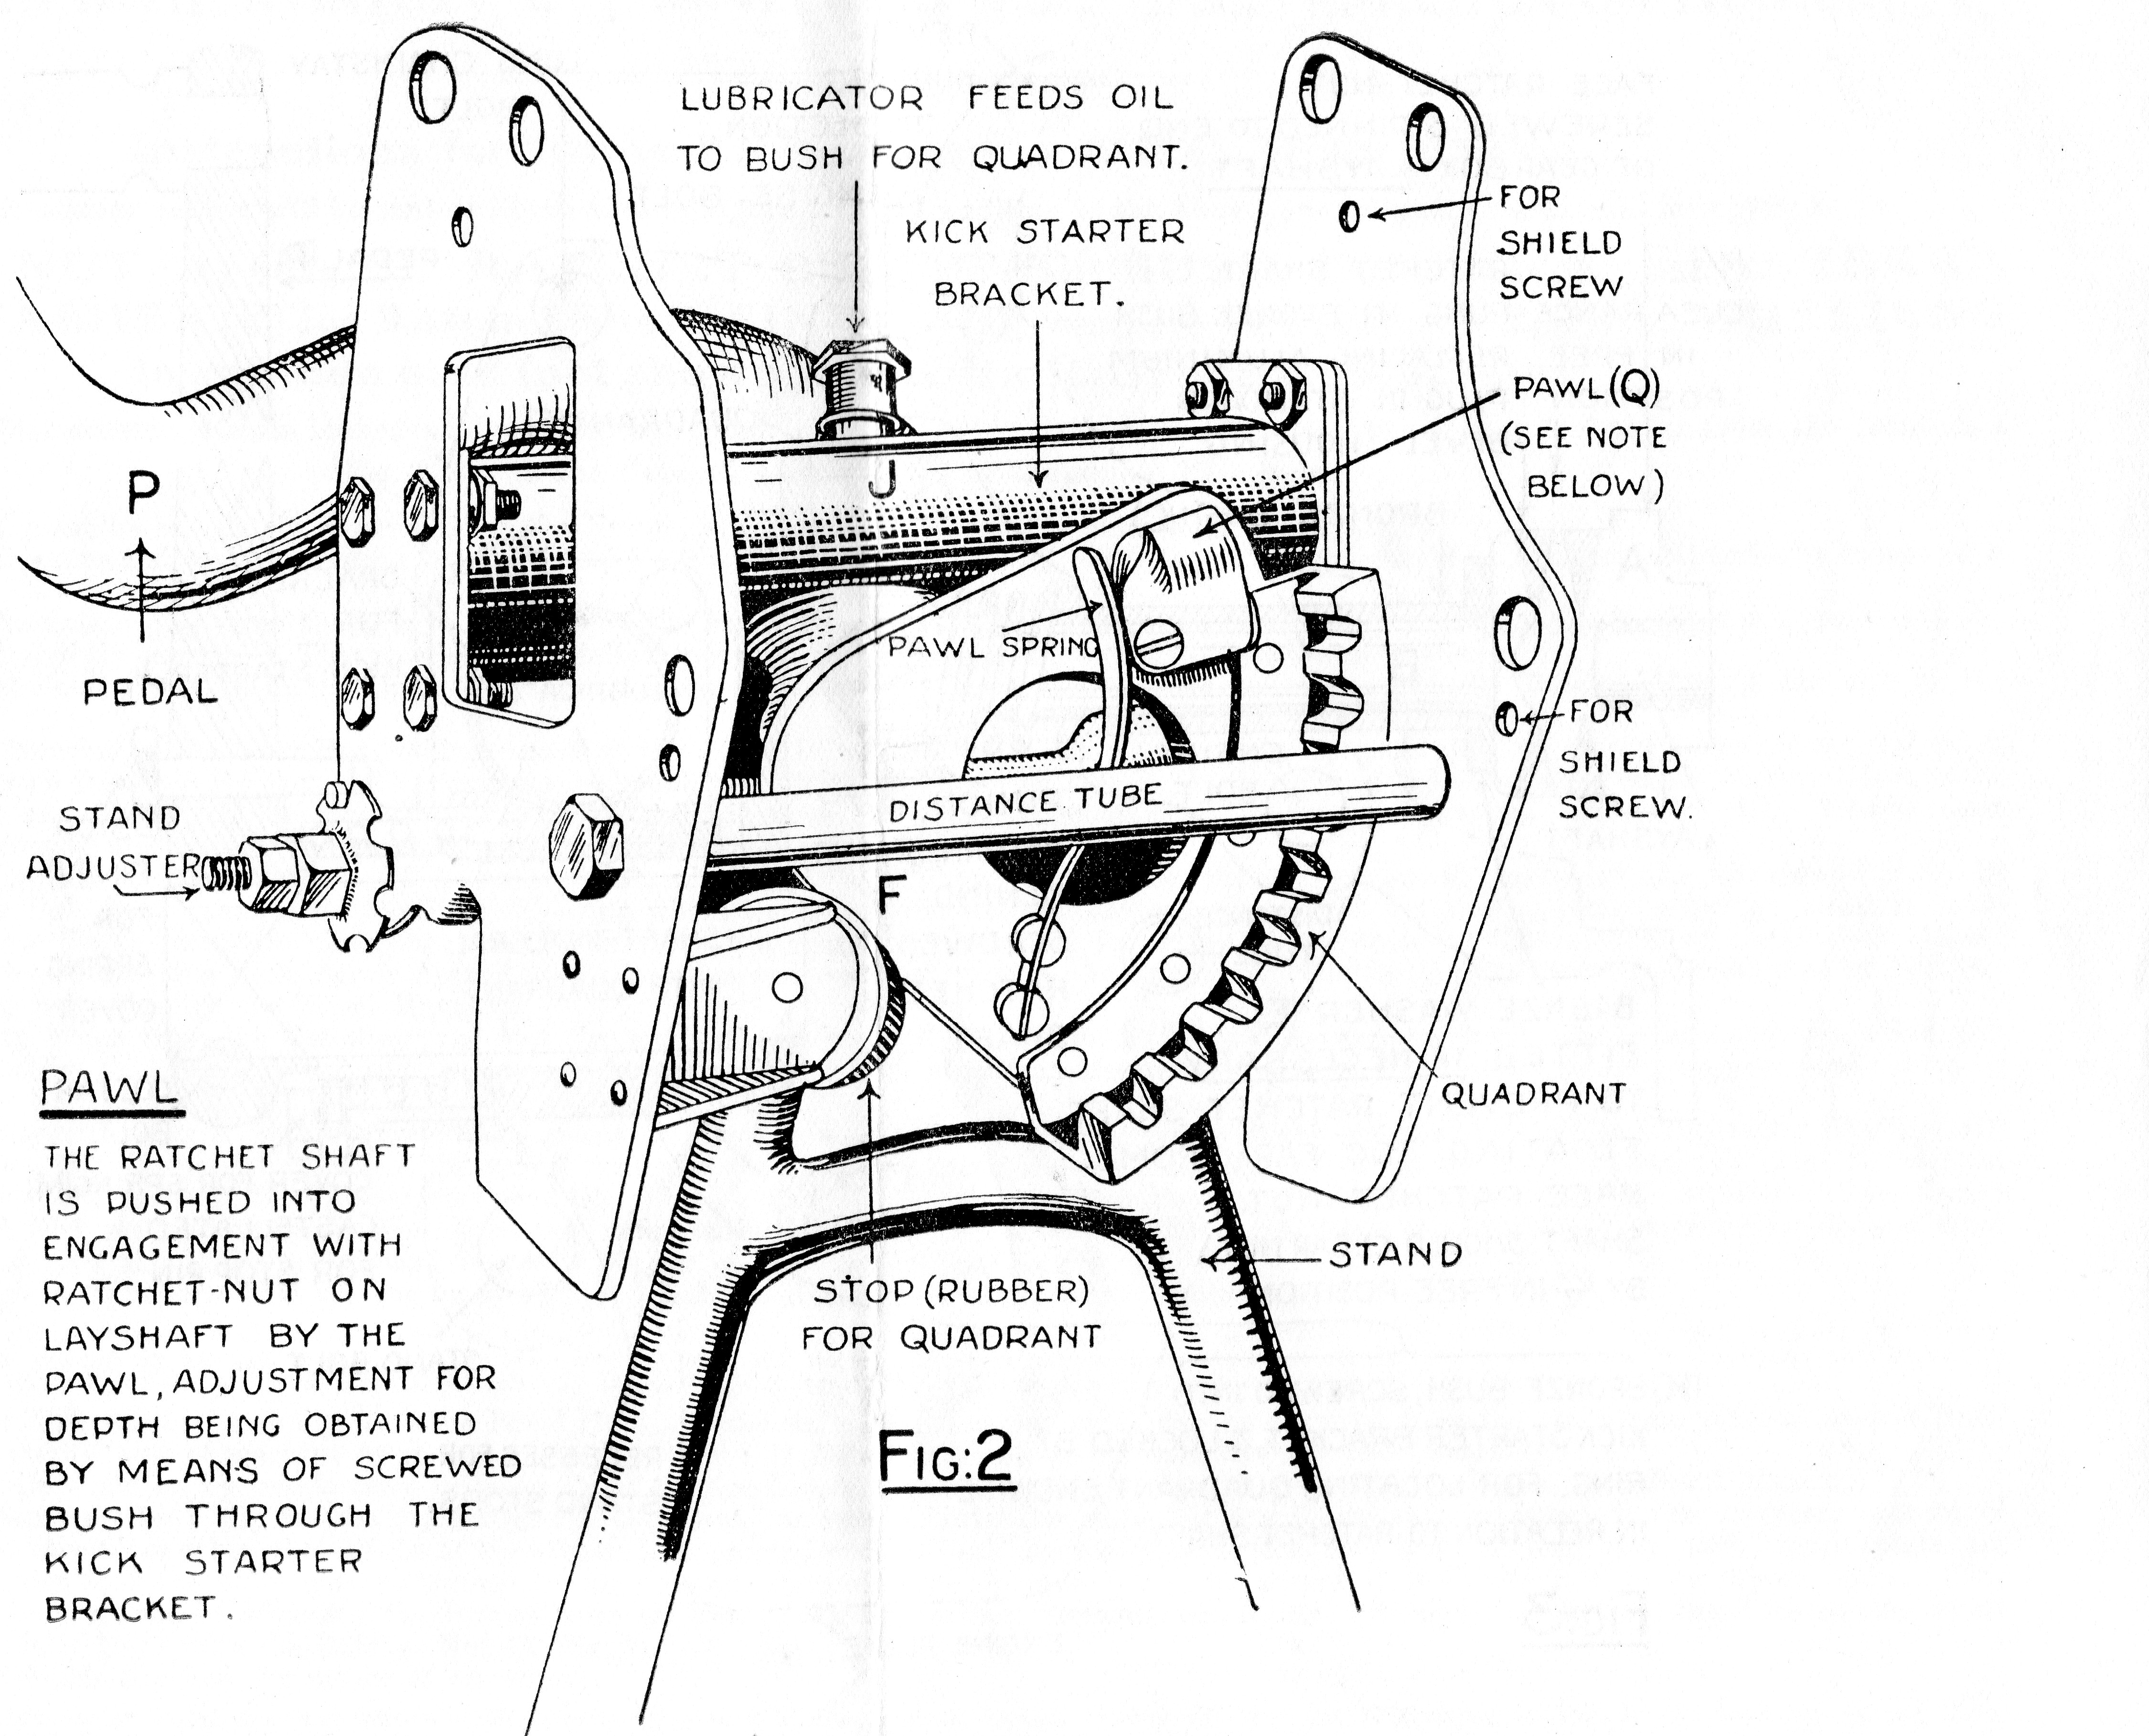
Fig. 2 Shows the Kick-starter details looked at from the front end
The Power Unit must be completely removed from the Frame, and should be thoroughly cleaned externally.
Remove Bevel Housing and replace existing nut on end of Layshaft by Ratchet Nut (A) (Fig. 3). This nut should be screwed well home by means of a large spanner.
Drive out the aluminium plug from the hole in the back of the Bevel Housing, and insert the bronze bush (C) for Ratchet Shaft. This is a press fit in the hole, and is sent out slightly oversize. This should be carefully fitted with the flange on the outside of the Bevel Housing.
Pass the Ratchet Shaft (B) through the Bush (C) in Bevel Housing with the Ratchet Face ready to mesh with the Ratchet Nut on the end of the Layshaft.
Offer the Bevel Housing to the Gear Box, taking care that the spigot is well home. Test the amount of end play on the Ratchet Shaft before it commences to engage on the Face Ratchet. This movement should be 1/32-in. as shown in Fig. 3. If the play is excessive, the Bronze Washer (E) is to be dressed to thickness and fitted until the necessary float of 1/32-in. is obtained on the Ratchet Shaft in the free position. (See Fig. 3.). This is most important, as an excessive amount of play here will interfere with correct adjustment later.
Now screw Pinion (D) to the end of the Kick-starter Shaft, placing Return Spring behind the Pinion. A small portion of the aluminium is to be chipped away on the right-hand rear end of the Bevel Housing where the Quadrant will foul towards the end of its stroke. Only sufficient metal is to be chipped away to allow the Quadrant to clear, so as not to decrease the strength of the boss for the main engine bolt. The amount of metal to be cleared can easily be found by offering the Kick-starter Assembly into position and marking off from the Quadrant. Bolt up the Kick-starter Assembly as in Fig. (1.) by means of the two bolts through the Bevel Housing.

Fig. 3 Shows the General arrangement of the whole Kick-starter
Remove Sparking Plugs from the Cylinders and test the mesh of Quadrant (F) with Pinion (D), taking care that good mesh is obtained the whole way across the Quadrant (Fig. 3). If this is not satisfactory, adjust the position of the Quadrant crosswise by means of the packing pieces supplied, and shown by arrow in Fig. 1.
It may be necessary, in order to obtain proper engagement as above, to shift (i) both packing pieces to the left-hand side of the Kick-starter Shaft, or (ii) to the right-hand side, or (iii) one either side. The correct mesh for the Quadrant having been obtained, now adjust the Bronze Bush (K) (Fig. 3) until the pawl (O), Fig. 2, pushes the Shaft for Kick-starter completely into engagement with the Face Ratchet previously screwed to the Layshaft. The Bronze Bush (K) is screwed 20 threads to the inch, and, therefore, a fine adjustment can be obtained. This adjustment should be very carefully made, and when satisfactory, the Bush (K) should be locked well home by means of the Lock Ring (L), Fig. 3.
Now insert Plugs in Cylinders, hold the engine steady, and test the Kick-starter against the compression.
NOTE. — Push the Kick-starter Pedal smartly down to engage the Ratchets. This happens about 2-ins. down the stroke of the pedal. Now maintain a steady pressure on the lever, pushing same completely through this stroke. Do this several times, and note if there is any tendency to over-ride the teeth on either the Quadrant and Pinion or the Face Ratchets themselves. If the adjustment of the Bush (K) is correct, this tendency will not appear, and everything will be found in order.
Now remove the Kick-starter Assembly from the Bevel Housing, and fix stand to same, which can be removed from the old engine plates. Attach Kick-starter Assembly to main frame of machine by means of the long bolt and distance tubes, which pass through the Chainstay.
Replace Engine Unit and fix by two forward bolts on Front Engine Mounting, and two bolts through Rear Engine Plates, and Bevel Housing.
If there is any tendency for a slip to take place after the Quadrant has meshed with the pinion, this will probably be found due to a certain amount of set which is likely to take place when the weight of the engine is supported on the back engine plate. The two holes through the back engine plate are clearance holes, in order that the bolts may be pushed through easily, otherwise the threads would be burred if the bolts had to be driven home. This tendency to slip can be overcome by adjusting the Bronze Bush (K Fig. 3) a little further forward, which has the effect of driving the Kick-starter Shaft (K Fig. 3) more definitely home with the Ratchet Nut (A Fig. 3).
Attach two Mudshields supplied, by means of set screws.
NOTE. — If the Kick-starter Pedal does not return itself smartly by means of the internal spring, remove the stop pin (N), shown in Fig. 1, and turn the Spring Cover (M) by means of a "C" Spanner, until more tension is obtained on the spring. Re-insert stop pin and test again.
From "Instructions for fitting Kick-starter to A.B.C. Motor Cycles" leaflet by Sopwith Aviation Company
Courtesy of Richard Johnson
See also "The Sopwith Kickstarter"